
Hosting hugo on cloudflare
Created: August 18, 2023 4:50 PM
This week I have been looking into lightweight web presences. Specifically how to you create decent a website without the usual costs and design overheads.
I have used Hugo in the past (a static website generator) which unlike wordpress is fast and sites can be hosted free/cheaply using online services from cloudflare/github/firebase. Written in go (language) there is a bit of learning curve related to templating and themes as well as having to set up a local development environment.
It is probably worth the effort but I recently had a problem with a site that I had built and hosted on firebase. I couldn’t find the original project on my “new” laptop (it may not have been migrated) and beside all the git sync and CLI tooling was likely to be a problem to recreate…
I had a look at Carrd.co and decided that it is the right balance of cost and functionally. Anyone that wants a (one page) web presence and is willing to do a bit of formatting/layout should use Carrd. Full stop. If this you - stop reading and go and sign up - pay the money - $19 a year.
It is a great web product and example of EVERYTHING good about user experience, understanding customers and simplicity. While you need a rudimentary understanding of web plumbing - anyone can get a great web presence in 30 mins. If you do decide to head over there use my referral code: https://try.carrd.co/342l6h6h
Want to get a bit more technical?
So I Set up my site digital-nerve.net using Carrd.io and realised that I wanted to do a bit more than have a single page. Specifically, how can I publish content - like this, on the domain, cheaply? I had a look around and came across a few options:
- blogstatic.io - from $19 per year
- feather.so - from $390 per year
- superblog.ai - from $313 per year
- dropinblog.com - from $228 per year
Blogstatic is probably the best fit, but if you have a couple of sites then you will need to pay for each separately.
So what does DIY look like?
Hugo projects hosted on a Ubunutu VM, synced to a github repository and hosted on cloudflare pages (for free). While I tried to get it working in a docker container I just couldn’t make it work - https://nunocoracao.com/posts/202206-homepage-guide/ .
So here are some step-by-step instructions for hosting a blog for free, from a Mac.
You will need:
- To be able to create a Virtual Machine - I have a Synology NAS which is ideal. The benefit is that I can switch off the VM when not building any hugo sites and it retains the relevant git links (read on).
- A local (on your machine) IDE - Visual Studio Code will do nicely.
- A github account
- A cloudflare account (and perhaps a domain)
Step 1
Download ubuntu server or your preferred Linux distro and spin up a VM - installing SSH on the way.
Step 2
Install the Visual Studio Code Remote - SSH extension and while you are there you may as well add the GitHub Repositories extension.
Step 3
Connect to your VM using SSH from terminal inside VS Code.
Install hugo
sudo apt get install hugoCreate a directory for ALL your hugosites
mkdir hugositesCreate your first hugo project:
hugo new site YourProjectThis will create a new folder YourProject along with all the necessary hugo related structure.
Step 4
Set up GIT for YourProject - it is important that you run the command from the new YourProject directory:
cd YourProjectgit initAt this point head over to GitHub and create a new repository (without the README.md) and add your account/repo details:
git remote add origin https://github.com/<your-gh-username>/<repository-name>
git branch -M main
At this point you may need to set some global git parameters and also log into GitHub locally from within VS Code. VS Code handles Git authentication nicely.
Once in you can push the current project files to GitHub:
git add .
git commit -m "first commit"
git push -u origin main
Step 5
Fiddle around with hugo.
Hugo has lots of themes that can be installed: https://themes.gohugo.io/
The way that they get added is usually via a git submodule. This means that the themes can be updated independently. For the purposes of this walk through I chose the Coyote theme and was able to add it:
git submodule add https://github.com/nightswinger/hugo-theme-coyote themes/coyoteYou can follow the theme specific instructions here: https://github.com/nightswinger/hugo-theme-coyote . When dealing with hugo you will need to make changes to the config.toml (now hugo.toml) file to get things up and running as well as looking at how to create new posts.
My config file contains:
baseURL = '/'
languageCode = 'en-us'
title = 'digital nerve'
theme = 'coyote'[outputs]
home = ['HTML', 'JSON']If you decide to play with the theme .css I suggest that you clone the theme repo and then host your own custom repo on GitHub as your changes will be overwritten at build time.
The https://gohugo.io/getting-started/quick-start/ is also a useful resource for getting things set up and has a different template example.
Once things are hung together - go ahead an start the local hugo server and what it looks like
hugo server→ probably fiddle around some more with hugo (hopefully not for too long)
FINALLY → push all of your changes to GitHub
git add .
git commit -m "finished fiddling"
git push -u origin mainx
Step 6
So at this point we are going to head over to cloudflare and follow these instructions: https://developers.cloudflare.com/pages/framework-guides/deploy-a-hugo-site/ head down to the bottom and follow the “Deploy with Cloudflare Pages” instructions.
You will note the information about the baseURL and this is related to how you plan to deploy your site. By default the site will be deployed on a cloudflare pages sub domain that you have chosen. Since this takes the form of: .<your_choice>.pages.dev I found that the hugo/config.toml needed “/” as the base URL.
For belt and braces I also added (not sure if it is needed):
hugo -b $CF_PAGES_URLIt is more likely that you will be running your site on a (sub)domain which can be added on the pages settings “custom domain” and if your domain uses cloudflare DNS - they create the relevant CNAME records.
Step 7
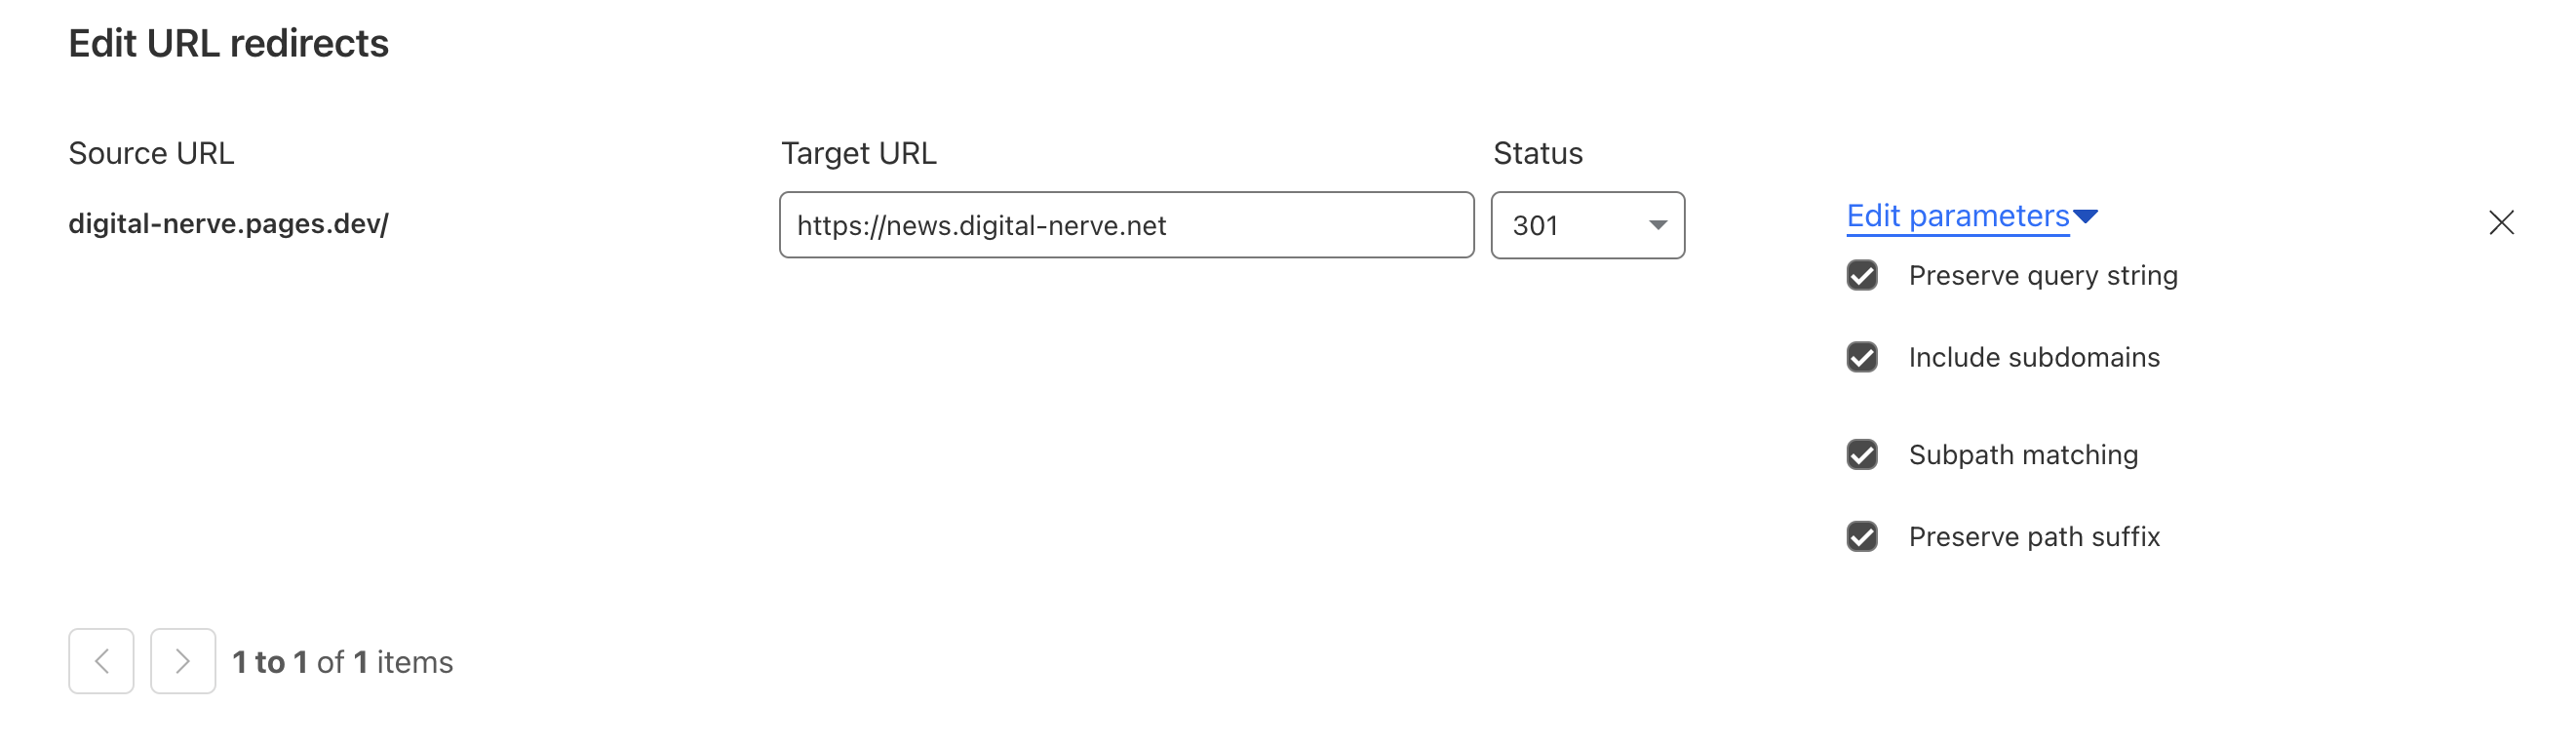
Once you have successfully deployed your hugo site on cloudflare pages you may need to fix the URLs. I didn’t want my content showing up at .<your_choice>.pages.dev AND news.digital-tiger.com so cloudflare offers their bulk redirect solution: https://developers.cloudflare.com/pages/how-to/redirect-to-custom-domain/ . With the single redirect below - everything seems to be working.
Conclusion
I can now add a blog post to the VM Hugo environment and then push the changes to GitHub and have them automatically deploy to cloudflare pages.
For me the real benefit is that I can do this across many sites with different hugo themes and domains without needing to keep everything on my local machine.